
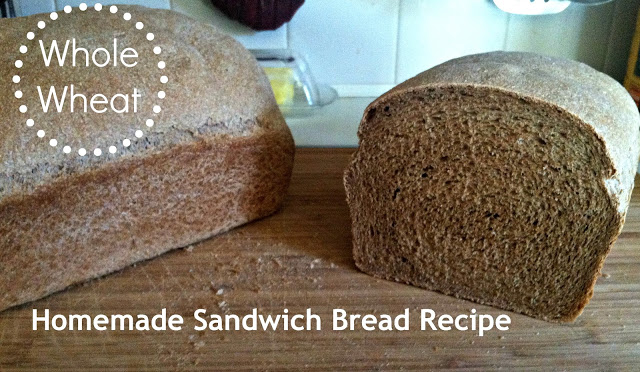
Is there anything better than the smell of freshly baked bread? Uh … YEAH! The TASTE of freshly baked bread! About 2 years ago when I decided to try my hand at bread-making, I was beyond discouraged at the results because I was determined to use 100% whole wheat. Unfortunately, I was becoming an expert brick-maker instead of bread-maker. I was told by an older, “more experienced” lady that I would NEVER have good bread unless I used at least some white flour. Ok, sorry, but that just didn’t sit right with me. There’s something so rewarding about making your own bread, so I was determined not to give up. I don’t like to eat anything packaged with ingredients I can’t pronounce or wouldn’t need to add myself (like preservatives), and store-bought bread is no exception. I pressed on.
After 2 years of experimenting, I have finally found an awesome, fool-proof recipe! Here’s the downside: This recipe is not “soaked”. Soaking is a whole other blog topic, which I’ll get to soon enough, but suffice it to say that grain is NOT inherently bad for you – contrary to what the latest nutritional trends might suggest. BUT (and this is my huge disclaimer), the wheat flour you buy at the store is not your grandmama’s wheat!
Wheat is one of those things that really, really, really should be organic (read “non-GMO” – genetically modified organism, ie. modified in a lab). Additionally, all grains and beans should (really, must) be soaked to maximize nutritional value and minimize nutritional damage (like gluten allergies). AND, most of us get way too many grains in our diet, so it should be more at the top of the food pyramind than the bottom.
As I said, this will be another blog on another day. I will very soon attempt to convert this to a soaked recipe because, yes, it’s that important! Once I perfect that, I’ll post an updated recipe. In the meantime, here you go! This is a NON-crumbly recipe that lends well to sandwiches, even folding a piece in half. Happy baking!
PRE-BAKING: Grinding Grain
I like to grind my own grain to get the freshest flour possible because it begins to lose its nutritional value almost immediately. I have the Blentec Kitchen Mill, which sounds like a jet engine taking off in your kitchen. Soon, I hope to replace it with the Country Living Grain Mill. But, mine does the job, and I’m grateful for it!
I buy my wheat berries in bulk through a co-op for about $19/25 lbs. It’s largely what makes this so economical! A word about wheat: you need a hard wheat for bread-making, and many people prefer the taste of white wheat over red wheat (myself included). It just has a milder, sweeter flavor. So, I use hard white wheat.

STEP 1 – PROOFING YOUR YEAST
Mix 4 cups of hot water (115 degrees if you want specifics), 2 tsp dry active yeast, and 1 tbsp honey. Let this sit (proof) for about 10 minutes until your mixture looks bubbly and yeast is well dissolved. You might want to do this in your mixer, but this recipe can be done by hand, too.

*If your yeast doesn’t look a little bubbly, it may be old. Also, be sure not to use quick rise yeast with this recipe. That’s only used for rapid rise/single rise recipes.
STEP 2 – MAKING THE SPONGE
After 10 minutes, add 5 cups of whole wheat flour and mix well. Cover and let this sit for 30 minutes to create “the sponge”. It’s called a sponge because of the texture at the end of this step. Here’s what it looks like after mixing in the wheat:

And here’s the “sponge” after the 30 minutes:

STEP 3 – MIXING AND KNEADING
At this point, you’ll probably find it much easier if you’re using a mixer with a bread hook. Mix in the following:
¼ cup oil (melted coconut oil is the best nutritionally, but extra virgin olive oil is fine, too)
2 tsp unrefined sea salt (use what you have, even if that’s plain old table salt J)
2 tbsp dough enhancer (you can buy this online or generally at a health food store, too) – now this is not a “whole food” ingredient and is optional, but it helps make for a fluffier loaf. Use if you want!
1/3 cup vital wheat gluten — also optional!
Slowly add about 3.5 cups of whole wheat flour – now this is where you could add white bread flour if you really want to, but I think you’ll be pleasantly surprised with the results of 100% whole wheat.
Mix this for about 8 minutes or so in your mixer.
**This dough will be VERY wet in your mixer. If you keep adding flour to get it to “pull away” from the sides, you’ll be there all day. At this point, turn it out on a floured surface and be amazed how quickly it “dries out” with barely any flour added! Notice how wet it is in the picture??

Kneading should not be exhausting work! It’s just gentle rolling and folding. The dough should no longer be sticking to your finger when you’re done. When you gently poke it with your finger, it should rebound a little. This means the gluten, or main wheat protein, has been properly developed. If you’ve decided to do this step by hand, you will knead for anywhere from 10-20 minutes. Here is what it looks like after kneading it on this lightly floured surface:

STEP 4 – FIRST RISE
Oil a large bowl (again, I like to use coconut oil) and put the dough inside. Flip it once so it’s got a slight oil coating to keep it supple as it rises. Let it sit for about 1.5 hours in a warm spot, if you can find one. The goal is to get it to double in size. If you let dough rise for too long, the gluten gets too fragile, and you could end up with a collapsed loaf. Just sayin’. These are pictures before and after this first rise:


STEP 5 – PUNCH DOWN AND MAKE LOAVES
At this point, your dough will be full of air, so you literally punch it down to “de-gas” it and then let it rest for a minute. After all, you’d want a minute to rest if you just got beaten down, too.

Turn it out on a lightly floured surface and knead it for a minute or so. Again, it shouldn’t be sticky but should be moist enough to not crack and split as you’re kneading. Clear as mud? J
USING A LARGE KNIFE, cut your dough in half. Never tear dough – it just doesn’t like it! Roll one half out with a rolling pin and then, using your hands, roll it up on itself and pinch the seam together. Then, pull up both ends to “tuck them under” and pinch those seams. A “seam” is where the dough is overlapping and needs to be pinched to stay together. Repeat with other half. It doesn’t have to look pretty! See?! 🙂 The lower picture is the bottom side with tucked and pinched seams.


Place your loaves in oiled baking pans. I recommend larger pans (mine are 9.25 x 5.25 x 2.75”) because this recipe tends to produce large loaves.

Let rise again for 30 minutes.

STEP 6 – BAKE!!!
Bake at 350 for 35-40 minutes until golden brown and sounds hollow when you tap the top.
STEP 7 – ENJOY!


Ideally, you should let the bread cool before cutting into it. Yeah, right. We never do! But I do recommend using an electric knife if you have one. This is a rather long process, so you will want to do this on a morning when you have other things to do at home (ie. no ballet class for your 4 year old that day).


More Stories
What’s Cookin’? Pizza Casserole Recipe
What’s Cookin’? Eggplant Pizza Recipe
What’s Cookin’? CHICKEN STOCK!